- Share This Topic
- Kosday Solutions Website
-
Programming with Linkar
- Linkar Framework for .NET and CORE
- Linkar Framework for JAVA
- Linkar Framework for C
- Linkar Framework for Node.js
- Linkar Trainer utility
- Linkar Web Services
- Linkar REST API
- Linkar Clients for .NET, CORE and MONO
- Linkar Clients for JAVA
- Linkar Clients for C
Linkar Framework
Linkar Web Services
Linkar REST API (deprecated)
Linkar Clients (deprecated)
-
More Support
- Download Help Manual
This topic describes how to configure an EntryPoint, also referred to as an EP. See EntryPoints for an introduction to the topic.
Each EntryPoint has a series of common properties, and other properties that vary depending on the database and the type of connection to it.
To continue entering a new EntryPoint using the New EntryPoint Wizard, please see Configuration Details below.
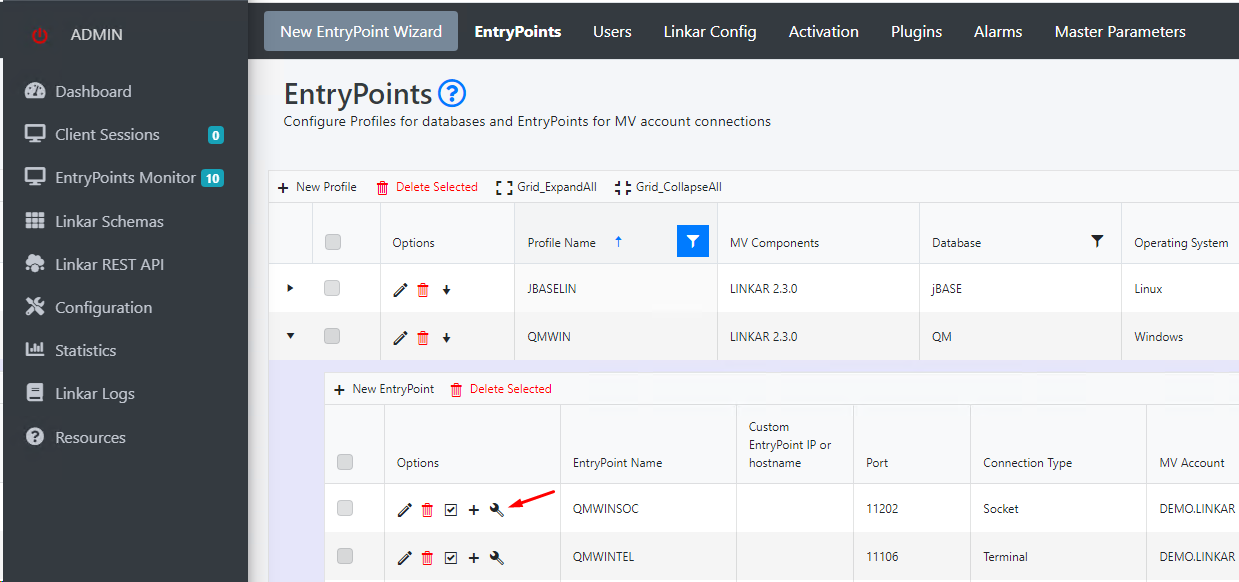
Upon entering the EntryPoints tab from the top menu, all defined Profiles are seen in a grid. (See Profile Configuration) Multiple EntryPoints are defined for a single DBMS server Profile. Each Profile reveals a sub-grid with its list of EntryPoints.
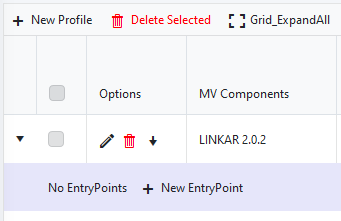
The arrow icon in the first column of the Profile grid, expands the grid to show all EntryPoints associated with the Profile. Press the Grid Expand All button to show all EntryPoints of all Profiles.
The grid shows when no EntryPoints have been defined for a Profile:
|
Individual EntryPoints can be enabled or disabled using the checkbox in the second column of the each EP sub-grid.
The LINKAR account contains all MV Components. Each data account used by Linkar must be Enabled from LINKAR.
Special files can be added to data accounts for demonstrations and testing. These files are also added to data accounts from LINKAR.
It helps to understand how these operations work.
Linkar is designed to configure other accounts from the LINKAR account. Login to LINKAR, then execute commands that reach out to other accounts to enable/disable functionality.
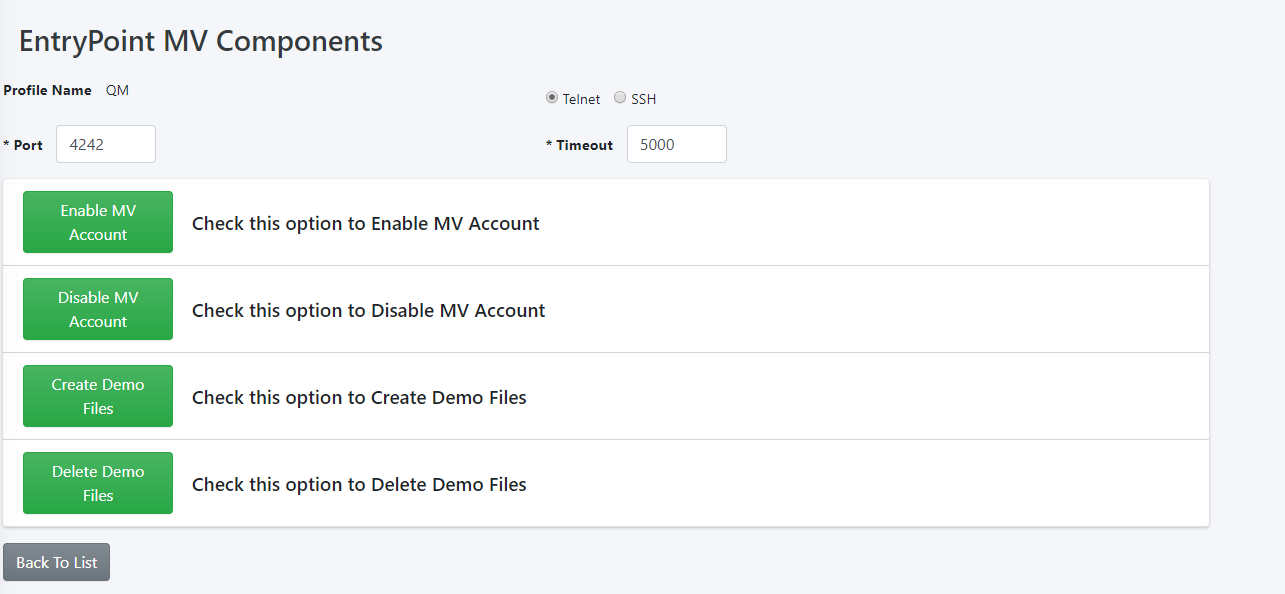
To perform the functions described here, this screen opens the same terminal emulator in the browser that is used to Install MV Components. This is an administration effort, not an application transaction. So this is not using the connection type or credentials defined for the EntryPoint. For example, the EP might be configured to use the Sockets Connection Type, but for this operation, terminal emulation will be used, with Telnet or SSH.
At the top of this screen the Terminal connection type can be selected, Telnet or SSH, and the TCP port used for this connection. Again, this might be different from that configured for the EP itself. This is a "one-off" connection just for this purpose.
Enable MV Account
On clicking the Enable MV Account button, a block of help text opens to help guide this process.
Enter a space-delimited list of accounts to be enabled. The account for the current EntryPoint is pre-entered but other accounts can be named here as well.
The Command to do this operation is shown: "LK.ENABLE account1 account2 ...". This browser interface does not need to be used. To perform this operation manually at any time, login to the LINKAR account and use LK.ENABLE from TCL. For details on LK.ENABLE, see MV Commands. Note in that topic, LK.ENABLE ALL to refresh all Linkar-enabled accounts.
Click the Start Connection button. Login to the LINKAR account. Other accounts will be enabled from LINKAR. When you are logged-in to the account and at the command prompt (TCL/ECL), press the green “Enable MV Account” button at the bottom of the screen. When done, exit from the server using your normal commands. Then press the red "Close Terminal" button at the bottom of the screen.
Disable MV Account
This process is exactly the same as above, but the TCL command is LK.DISABLE. For details on LK.DISABLE, see MV Commands. Note in that topic, LK.DISABLE ALL to disable all previously Linkar-enabled accounts.
Create Demo Files
This process is exactly the same as above, but the TCL command is LK.DEMOFILES. An account must be enabled before demo files are copied into that account. See MV Commands.
Delete Demo Files
This process is exactly the same as above, but the TCL command is LK.DEMOFILES DELETE account1 account2.
"Back to List" returns to the Profile/EP grid. |
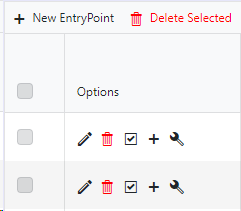
To create a new EntryPoint press the + New EntryPoint button in the header of the EntryPoint sub-grid. (The New EntryPoint Wizard from the top menu is recommended.) To delete an EntryPoint, click on the red Trash/Rubbish icon in the second column of the EntryPoint sub-grid, or check multiple EntryPoints in the first column and press the Delete Selected button in the sub-grid header. |
The EntryPoint sub-grid includes these columns:
1.Name of the EntryPoint (EP). 2.Custom EntryPoint IP or hostname. 3.TCP port on which Linkar SERVER listens for connections to the EntryPoint. 4.Connection Type. 5.Account to which the EP connects. 6.The number of permanent sessions defined. 7.The number of temporary (temporal) on-demand sessions defined. 8.Whether the EP starts automatically with Linkar SERVER (true/false).
•The pencil icon in the second column of the EP sub-grid leads to the Edit form for the EntryPoint. •The checkbox leads to a form to define MV Components. •The "+" icon allows to quickly create an Api Key for the selected EntryPoint. •The wrench leads to EntryPoint Parameters section.
All available EntryPoint properties are defined in the Create EntryPoint screen (see EntryPoint Properties below).
|
Linkar needs to know the necessary passwords to open database sessions. Linkar has two ways to provide the password to open sessions:
Within the Connection Types section there are boxes where the user types the required password.
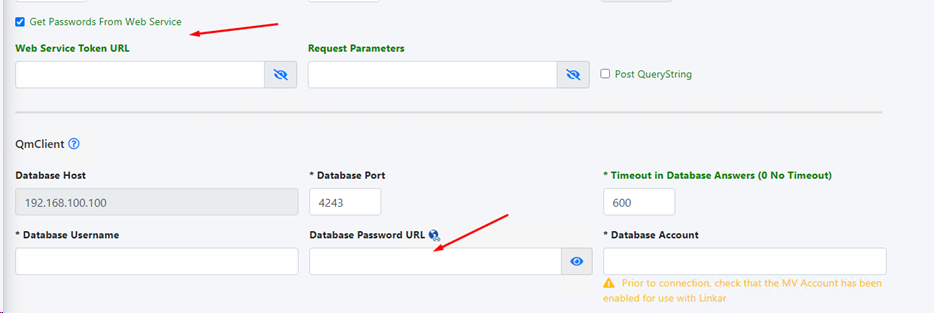
For those environments where passwords change regularly for security reasons, Linkar can get the password through a REST web service. To do so, the "Get Passwords From Web Service" switch must be activated.
Every time LinkarServer needs to open a line in the Database, if the "Get Passwords From Web Service" feature is enabled in the EntryPoint, before opening the line, the web service indicated in "Database Password URL" is consulted to obtain the last password.
The URLs for obtaining passwords, token requests and their parameters are stored encrypted.
Capture fields in Linkar Manager do not display data unless the show button is pressed.
How it works?
Web Services Token URL: If there is no authentication method we leave this box blank. And if the web service has some authentication method in this box we indicate the url to obtain the token. For example https://webapi.passwords.com/Token
Request parameters: We indicate here the necessary parameters to obtain the token. For example grant_type=password&userName=WebApi&password=xxx@xxxx&environment=8382000&idclient=CUST23
Post QueryString:If this option is enabled the parameters will travel as a QueryString in the request, and will not be part of the message body.
Database password URL: This box is inside the Connection Types section, and is the url to access the password. If a token has been obtained it will travel with the request. Example https://webapi.passwords.com/api/mypass/?dbpass
This web service must only respond with the requested password in plain text. For example mypass25
|
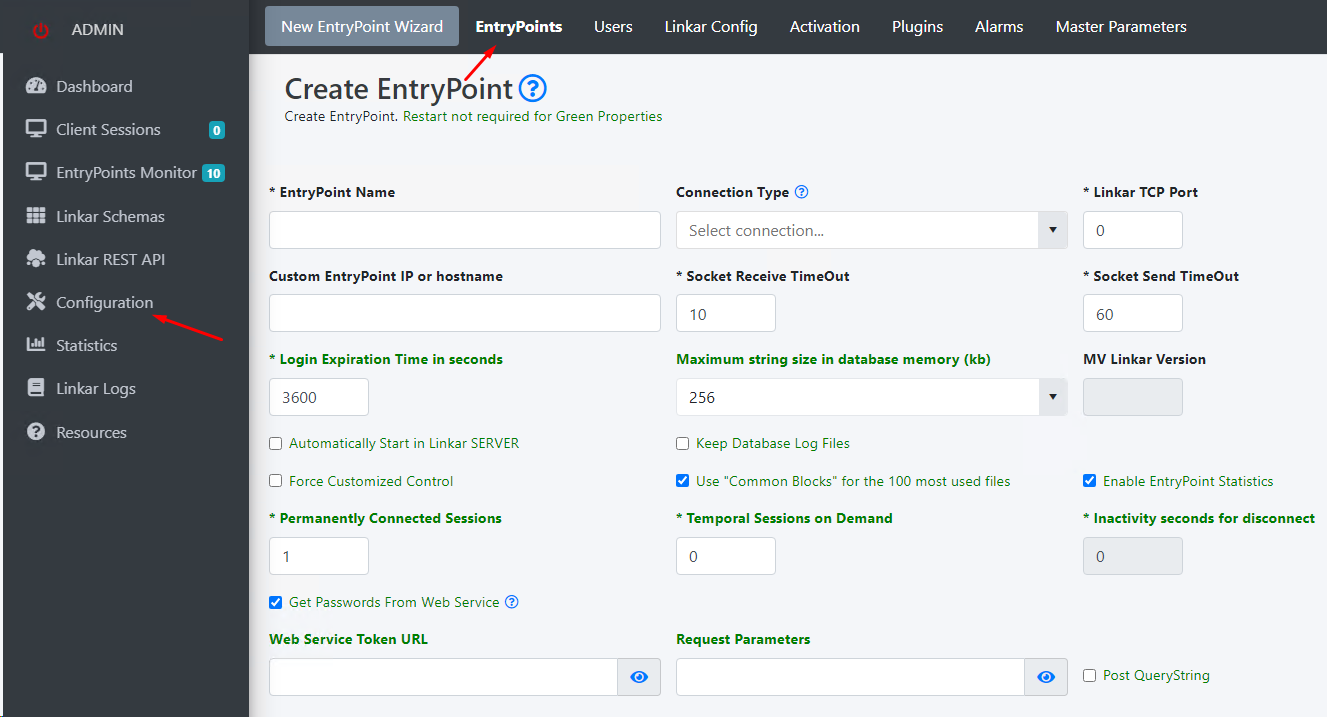
The screenshot below shows the Create EntryPoint screen as seen from the EntryPoints option in the Configuration area.
From the New EntryPoint Wizard the details of the screen are the same, only the header is different:
The table below describes all fields available for EntryPoint configuration. Refer to the screenshot above.
When changing an existing configuration:
•Some of these properties apply from the moment they change. Others take a little longer, or some action must be taken to apply them. •The change of some fields requires a restart of Linkar SERVER itself. •Most properties can be changed while the EntryPoint is running, without the need to restart the EP. •Others require a restart of the EntryPoint - not Linkar SERVER itself, just the specific EP. In Linkar MANAGER, properties with a green label do not need a restart of the EntryPoint after a change.
Mandatory fields are noted below, and by an asterisk "*" by the field label in the browser.
If using the New Entry Point Wizard, please click Next and continue with Step 3.
After setting the above properties, the bottom of the EntryPoint configuration screen prompts for details related to the Connection Type set for the EP. |
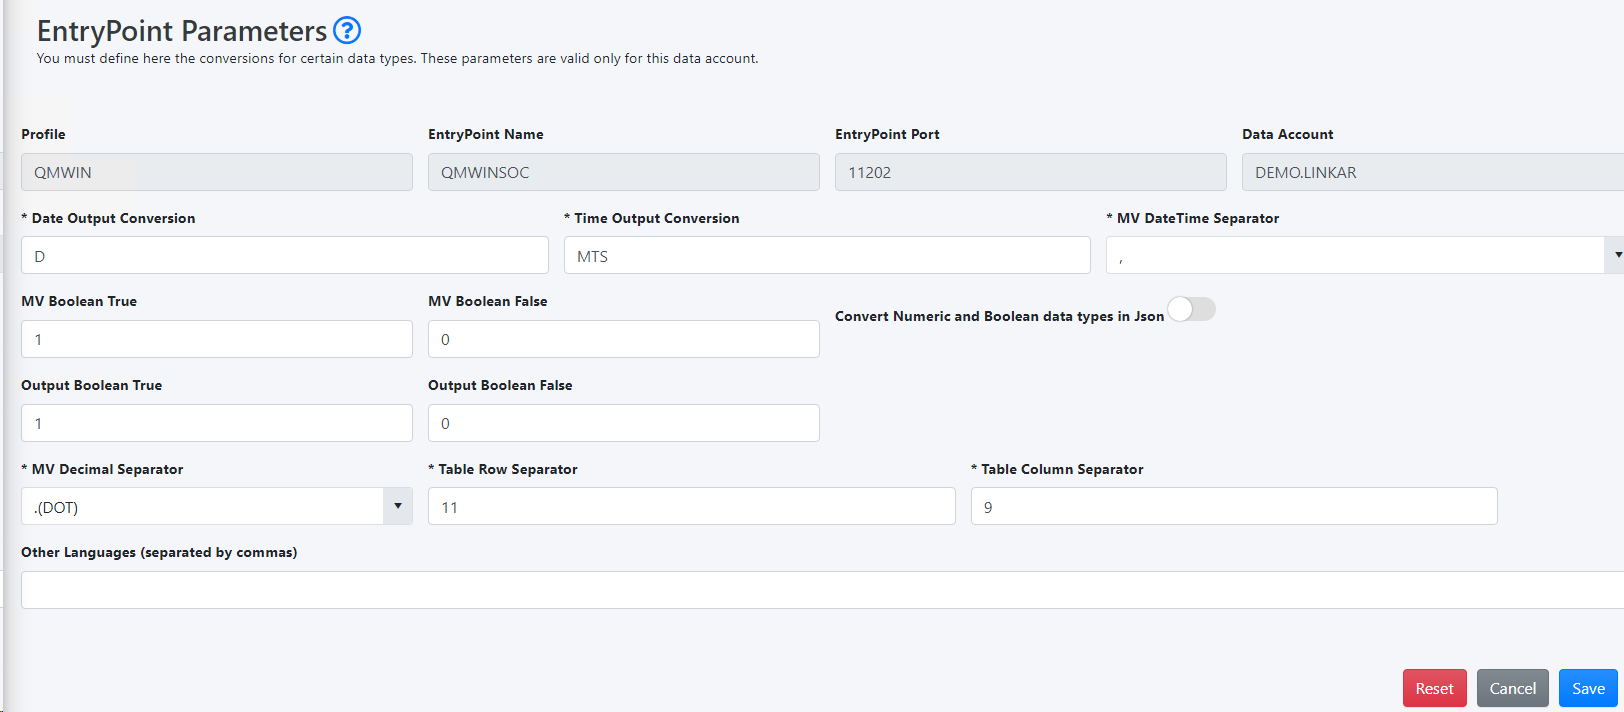
Master Parameters can be defined in Linkar MANAGER. These Master Parameters will be copied to a new EntryPoint each time you create it.
You can view these parameters using the GetVersion function. Accessible from the wrench in the EntryPoint grid.
The red Reset button assigns all Linkar Master Parameters to the EntryPoint, replacing previous customizations for the EntryPoint.
|


