- Share This Topic
- Kosday Solutions Website
-
Programming with Linkar
- Linkar Framework for .NET and CORE
- Linkar Framework for JAVA
- Linkar Framework for C
- Linkar Framework for Node.js
- Linkar Trainer utility
- Linkar Web Services
- Linkar REST API
- Linkar Clients for .NET, CORE and MONO
- Linkar Clients for JAVA
- Linkar Clients for C
Linkar Framework
Linkar Web Services
Linkar REST API (deprecated)
Linkar Clients (deprecated)
-
More Support
- Download Help Manual
If you have not already done so, please see the introduction page for this topic.
While this page is focused on installation, the update of MV Components is just a re-installation into an existing LINKAR account.
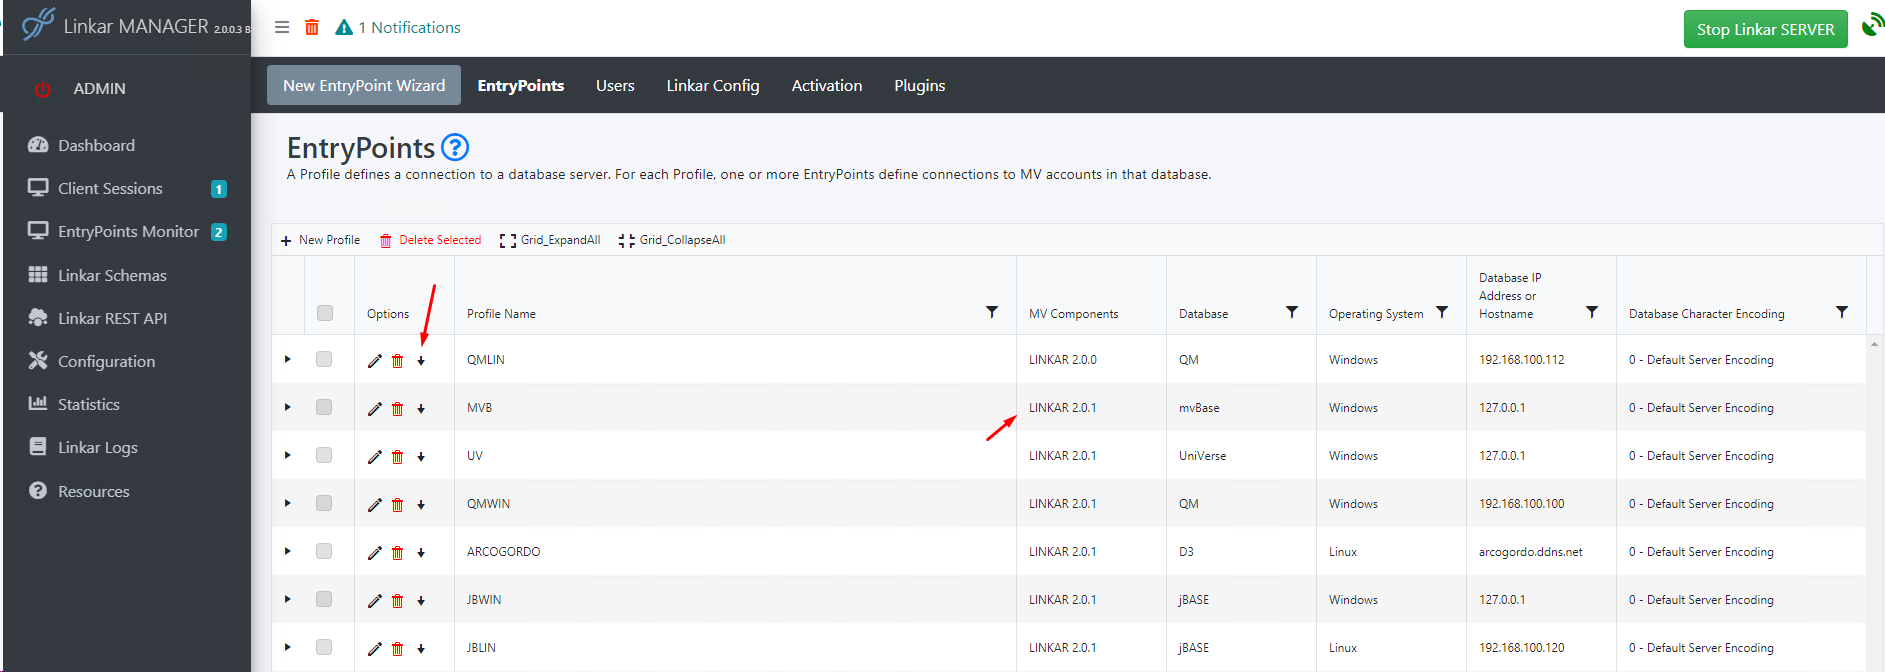
To install or update the MV Components in a database, under Configuration > EntryPoints, click the Arrow down icon in the second column of the Profile grid. The "Install MV Components" page will display, with current download links and basic instructions.

For each MV DBMS platform there is a different MV Components "pseudo-floppy" file. This file must be accessible to the database:
•If Linkar services are running on the same server as the database, then you will just need to know the full path to the file on that system. oWindows: %ProgramData%\KOSDAY\LinkarSuite\MV oLinux and macOS: /var/KOSDAY/LinkarSuite/MV •If the database is on a different system, the components file named below must be copied to that system, or network mapped drives and SMB shares may be used, as long as the file is in a path accessible by database. Please be aware of permissions for the user account running the database, owner/group access for the file, etc.
The device name pattern for the file / pseudo-floppy is as follows, where xyz is the version ID :
•Linkar_D3_x_y_z •Linkar_QM_x_v_z •Linkar_MB_x_v_z •Linkar_UV_x_y_z •Linkar_UD_x_y_z •Linkar_JB_WIN_x_y_z •Linkar_JB_LIN_x_y_z •Linkar_RT_x_y_z
Note: For D3 / Linux installations there must be an available non-compressed pseudo-floppy device defined. This will be attached rather than created. Note: Reality MV Components are with REALITY Emulation |
MV Components must be installed on an account with IDEAL or PICK flavor. Other flavors are not guaranteed to work properly.
It is necessary that all the data accounts have the pointer to the UV.ACCOUNT file and its record properly created with the full path in the field number 11.
In the MV Components account Linkar will create the pointer to the UV.ACCOUNT file and the record if it does not exist. |
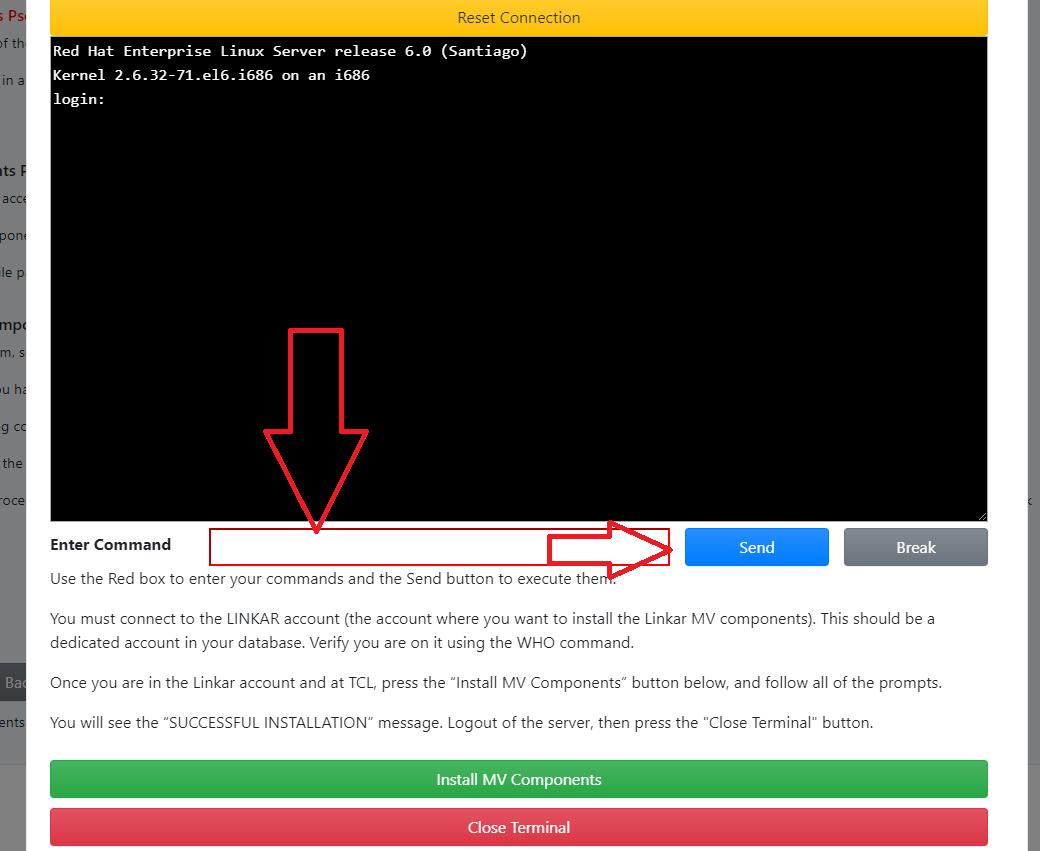
At the bottom of the Install MV Components screen is the following:
A Telnet or SSH connection is going to be made from the system hosting the Linkar services to the database. It is not important if your browser is running on a different workstation. The browser is connected to the Linkar MANAGER service, which is then connecting to the database.
Be sure the port is correct for the protocol. It is advisable to use a port that will lead as directly as possible to TCL/ECL, to avoid screen painting, emulation type issues, etc.
An error will occur if the initial connection to the database server is not successful after the Timeout value in milliseconds. |
Press the Start Connection button.
If successful, the database server will respond with a normal login for the selected protocol (which may be an OS-level login) as seen below.
If there is no text, just an empty black screen, press Send to see if that results in a prompt. It is possible that on initial connection the server may not respond with a login prompt. This is because the protocols do not require a CR/LF as a part of the connection, and different systems have different rules about what happens at that time, so the logon prompt may not be "volunteered" by this interface.
To use the terminal emulator in the browser, type text in the red text box, and either press Enter on the keyboard or click the Send button. In the screenshot below the pattern for the login prompt includes: ID in the red box, Send, password in the red box, Send... It's important to remember that text is not entered in the black emulator window. The window is display-only.
Follow this pattern of text/Send/text/Send to login to the LINKAR account. (If necessary, an empty line is sent simply with no text in the box, and Enter/Send.)
If a problem occurs, or for example you need to break out of a menu, click the Break button.
If there is a pause of some number of seconds, there may be a message displayed: "An existing connection was forcibly closed by the remote host." This simply means the login was not completed before the server disconnected the client. Click the yellow Reset Connection button at the top of the emulator. See Troubleshooting if required.
If there is a terminal emulation issue, the screen will contain unusual codes before and after text. To fix this, try setting the TERM type to something simple. See example below. Common types like VT100 and WYSE-50 cause control sequences to be sent to the terminal, which are not processed by this emulator.
Tip: If the same OS/DBMS User ID is always used to access the server with Linkar, add TERM DUMB or a similar command into the user profile to avoid the problem in the future. This might be in the D3 Users file, or for other systems in a .profile or .bash script.
|
 | Begin the Installation / Update |
Once positioned at TCL in the LINKAR account, press the green Install MV Components button at the bottom of the screen. Answer questions on the screen, again by typing in the red box, and then press Enter or click Send.
Press Y, then Enter/Send. Note: As seen above, the LK.INSTALL program shows (version 2.0.2.x). This may not be the same as the Linkar Suite version, nor of the MV Components currently installed (if updating), nor of the new version to be installed. The version shown is for the LK.INSTALL program itself, which comes from the LINKARPROC file in the same folder as the other MV Components. Updates to the MV Components file will increment the version ID of that file, but the LINKARPROC file name and contents are only updated if necessary. In summary, it is not an error if the LK.INSTALL version is not the same as others. |
See the section above: Important : Database must have access to MV Components file Enter the path where you saved the components file (pseudo-floppy). The help message above says "no quotes required". If using copy/paste it's OK if the text is surrounded in "straight" quotes. Curly quotes copied from documentation or elsewhere will cause a failure. Slash direction is not important.
Enter/Send
At this time the installer attempts to create a virtual device to access the media. |
For D3 systems, there will be a prompt to compile with FlashBASIC. If using the MVSP or SOCKETS Connection Type, Linkar programs must be compiled with FlashBASIC. If using the TERMINAL Connection Type, the code does not need to be flashed. Using FlashBASIC here implies all application subroutines used from Linkar will also be flash-compiled. This can be changed later if required. |
New Installation
Application accounts contain data which is accessed from Linkar. To enable a data account, the installer copies file pointers and verbs to the account.
If you are activating an account for use with Linkar, press "Y" in the red box and Enter/Send. Accounts can be enabled at any time but it is helpful to setup at least one account with the initial installation.
On entering Y, then Enter/Send, the following prompt displays:
Enter the name of the accounts you wish to activate separated by spaces.
Update To update an existing system it is easier to answer N to the Enable Accounts question. When the update is complete and the TCL prompt is available, use the "LK.ENABLE ALL" command to quickly update all accounts that have already been Linkar-enabled.
Note: An account enabled with an older version of MV Components may not function correctly after the LINKAR account is updated. Similarly client applications and database servers should always be using the same versions. Create an update plan to ensure client and server components are in sync, end-to-end. |
As noted in the introduction page, prior to beginning this install process, creating a DEMO.LINKAR account is advised. The name of the account is unimportant. If there are issues, this is a good place to start diagnostics. Accounts can be setup for demos at any time but it is helpful to setup one account during the initial installation.
If you would like to create the Linkar Suite demo files, press Y, then Enter/Send.
Enter the name of the account(s) where you want to create the files separated by spaces, then Enter/Send. Demo files cannot be installed to or used from the LINKAR account itself.
Other accounts can be setup later for Linkar demos using the LK.DEMOFILES command.
Note: An account enabled with an older version of Linkar demo files may not function correctly after the LINKAR account is updated. Accounts setup for Linkar demos must be updated re-Enabled (see above) and must get a demo file update. Otherwise Linkar TESTER and perhaps other utilities will not behave correctly. |
When an existing LINKAR account is updated, the following prompt may display:
If local changes have been made to this file, backup the file, then answer Y to the reset prompt.
There is no automated mechanism to re-integrate a modified LK.ERRORS file with an update. Please contact Support@Kosday.com to discuss options. |
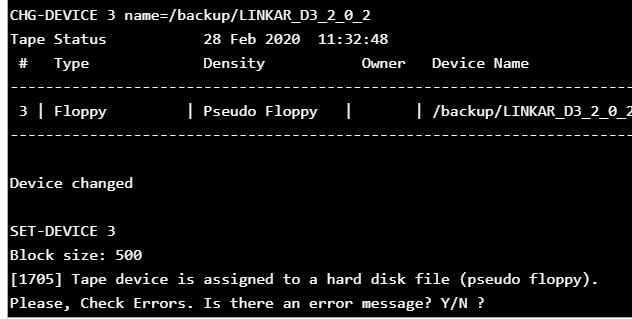
In this screenshot, a D3 virtual tape device is attached to access the file/media. The process is similar for other platforms.
From this point-forward, there will be prompts for to ask for confirmation that that install is proceeding as expected. The prompts appear after small milestones, like device attachment, loading of programs, compiling, cataloging, and device detachment.
If "yes, there is an error message", press Y, then Enter/Send. It may be necessary to use the Break button, type END, QUIT, EXIT, etc.. To do a final exit, click the red Close Terminal button at the bottom of the screen.
If you identify an error and can correct it yourself, please do so and restart the installation from the green Install MV Components button at the bottom of the screen. If something happened that you believe we should know about, or if you cannot resolve the error, please send details to Kosday Support, at Support@Kosday.com. Screenshots are always helpful.
If "no, there is not an error message", press N, then Enter/Send. Repeat the process each time the prompt appears.
After enabling accounts, demo accounts are configured with a LK.ORDERS file to simulate purchases.
Enter the number of Orders you want to create in the DEMO files. Try 1000, or 2000, or 5000+ ... |
Installation Complete!

When you see this message, the installation of the MV components has completed successfully.
From the TCL/ECL prompt, EXIT or QUIT as appropriate for the platform. There may not be a response as the socket connection for this emulation component may close before the output is rendered.
Press the red Close Terminal button to exit.
"Back to List" returns to the Profile/EP grid.


