- Share This Topic
- Kosday Solutions Website
-
Programming with Linkar
- Linkar Framework for .NET and CORE
- Linkar Framework for JAVA
- Linkar Framework for C
- Linkar Framework for Node.js
- Linkar Trainer utility
- Linkar Web Services
- Linkar REST API
- Linkar Clients for .NET, CORE and MONO
- Linkar Clients for JAVA
- Linkar Clients for C
Linkar Framework
Linkar Web Services
Linkar REST API (deprecated)
Linkar Clients (deprecated)
-
More Support
- Download Help Manual
|
Navigation: Configuration > Connection Types Terminal |
Scroll Prev Top Next More |
The Terminal Connection Type is supported for all supported databases.
This Connection Type collectively refers to conventional Telnet (port 23) and SSH (port 22) connections from Linkar SERVER to a database. Once a connection is established, requests and responses are then exchanged through these sessions.
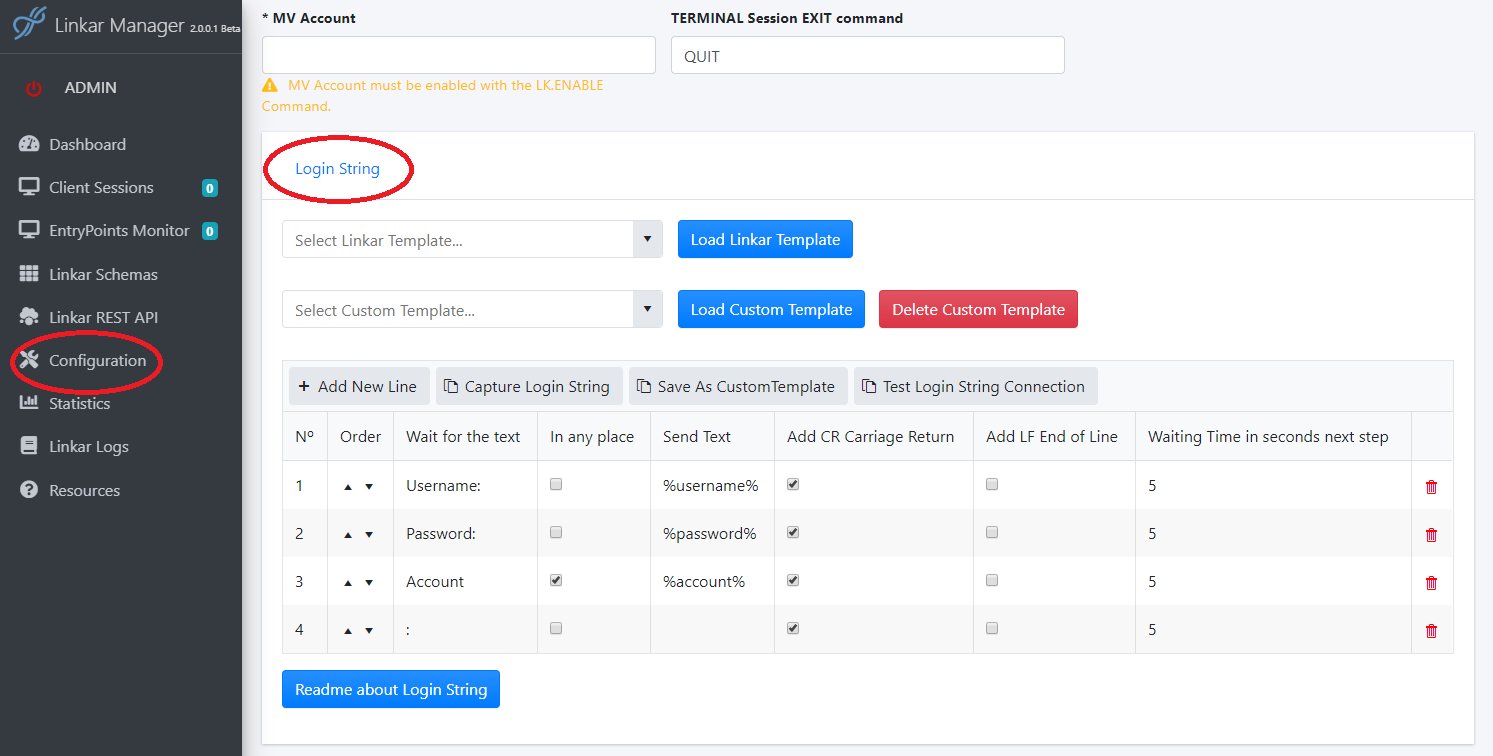
To open EntryPoints defined with a Terminal connection type, a "script" must be defined in the Login String section (see screenshot below). Depending on the environment, it may also be required to map control characters in the Character Conversion section.
Depending on details, the Socket Connection Type may need to initially use the Terminal type to connect into the database, so that it can start socket listeners and then exit.
As a guideline:
•Use Terminal connections when required and when it's desirable to have a minimal number of DBMS processes pre-started, with occasional temporary sessions created during peak time. This is the slowest connection type.
•Use DBMS-specific connection library types where possible in preference over the others, for performance and to better support temporary sessions. This is generally considered to be the fastest and most direct connection type.
•Use Socket connections when it is acceptable to pre-define the maximum number of expected DBMS licenses for high performance. This is faster than Telnet connections, but benchmarks are not yet available to compare with DBMS-specific types.
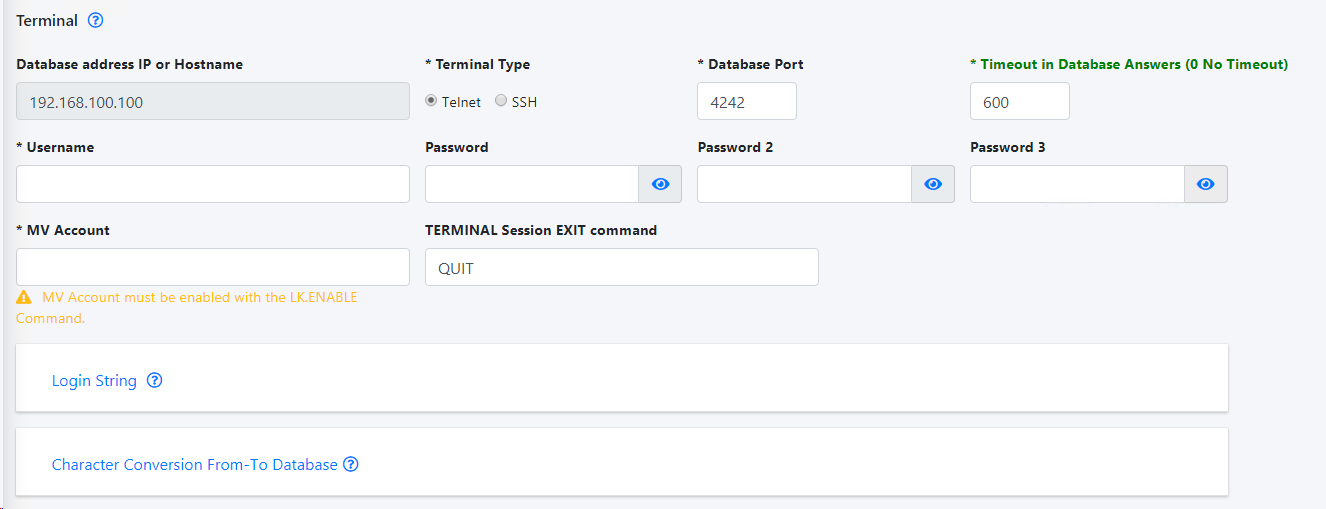
(Screenshots on this page show the bottom part of EntryPoint Configuration)
In Linkar MANAGER, properties with a green label do not need a restart of the EntryPoint after a change.
The Username and Password fields contain data that is used to replace the %template% values in the login string constructed below. These fields can really be used to supply any data in the login negotiation.
It is common for communications interfaces to use a User account dedicated to the purpose - whether for the initial OS login, the database, and/or the application. This makes it easy to identify logged-in processes. Similarly this allows a unique password to be assigned, where it may be inconvenient or undesirable to use a User name and password that belong to someone on staff. Consider creating a User called Comms, WEBSITE, mobileapp, WebServices, Linkar, or similar.
When using the New EntryPoint Wizard with this screen, on clicking End an option will be presented to enable the account for use with Linkar. |
For Terminal connections, Linkar MANAGER needs to communicate with the database by opening a Telnet or SSH session. From there, Linkar needs to follow a "script" to login with proper credentials, get to TCL/ECL, and then start programs to process requests. The purpose of the Login String table is to facilitate the creation of this kind of script for any environment.
Each row in the table details a pattern where text is expected from the database, and a response is then sent back. The best way to visualize this pattern is to open a Telnet session:
•Wait for the first prompt, usually for a User ID. Type in a User ID. Press Enter. •Wait for the next prompt, usually for a Password. Type in the correct Password. Press Enter. •This pattern continues until eventually there is only a TCL/ECL prompt.
Features described in more detail below:
•Linkar Templates with common predefined script patterns •Ability to save Custom Templates •Ability to Capture a Login String, which monitors output from the DBMS and captures your input responses. •Fine-tuning of the End-Of-Line (EOL) and expected maximum wait time for each step. •Ability to re-order, add, and remove steps (available in buttons and context menu on the table). •Ability to test the Login String with a live connection.
(Screenshots on this page show the bottom part of EntryPoint Configuration)
For D3, the first prompt is Range D3 ports to Force command d3 -port.number. Separated by semicolon. This only applies to D3 over Linux and AIX, where the d3 -n command from shell connects to D3 PIB n. This Linkar feature allows the administrator to set communications ports into a specific range of PIBs for organization and management. This is is not the same as D3 "nailed Telnet" ports - please contact Kosday Support to discuss that topic.
Before creating a new Login String, it may be desirable to select from one of the provided Linkar Templates.
•Select Linkar Template:
Linkar MANAGER includes a series of templates for connection to different databases and in different configurations. In this dropdown you can select one of them. Pressing the Load Linkar Template button will load that definition and you can use it as a base to configure your connection.
A default template is selected based on the DBMS type and OS. Please contact Kosday Support to discuss adding new templates to this list.
•Select Custom Template:
Once a Login String is defined, you can save it in a Custom Template for later use or in a new installation. Press the Save as Custom Template button and give it a name. Saved templates appear in the Select Custom Template dropdown, where they can be retrieved and used in other EntryPoints. Custom Templates are saved in the ConnectionCustomTemplates.xml file: - In Windows, under %ProgramData%\KOSDAY\LinkarSuite - In Linux and macOS, under /etc/KOSDAY/LinkarSuite
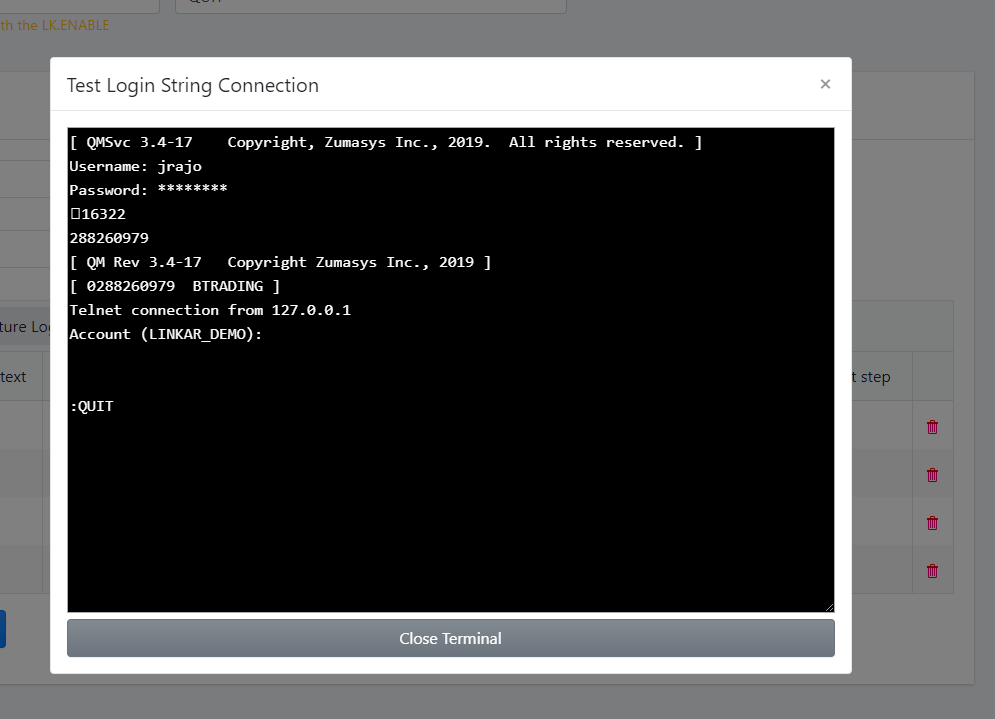
•Test Login String Connection button:
Once a Login String is defined (details below), press this button to verify that the connection progresses as expected.
If the screen verifies that the connection and disconnection to the data account are correct, the process is complete - The Login String is correctly configured. Otherwise, correct the errors revealed on the screen and try again.
•Save As Custom Template button:
(See Select Custom Template above)
•Capture Login String button:
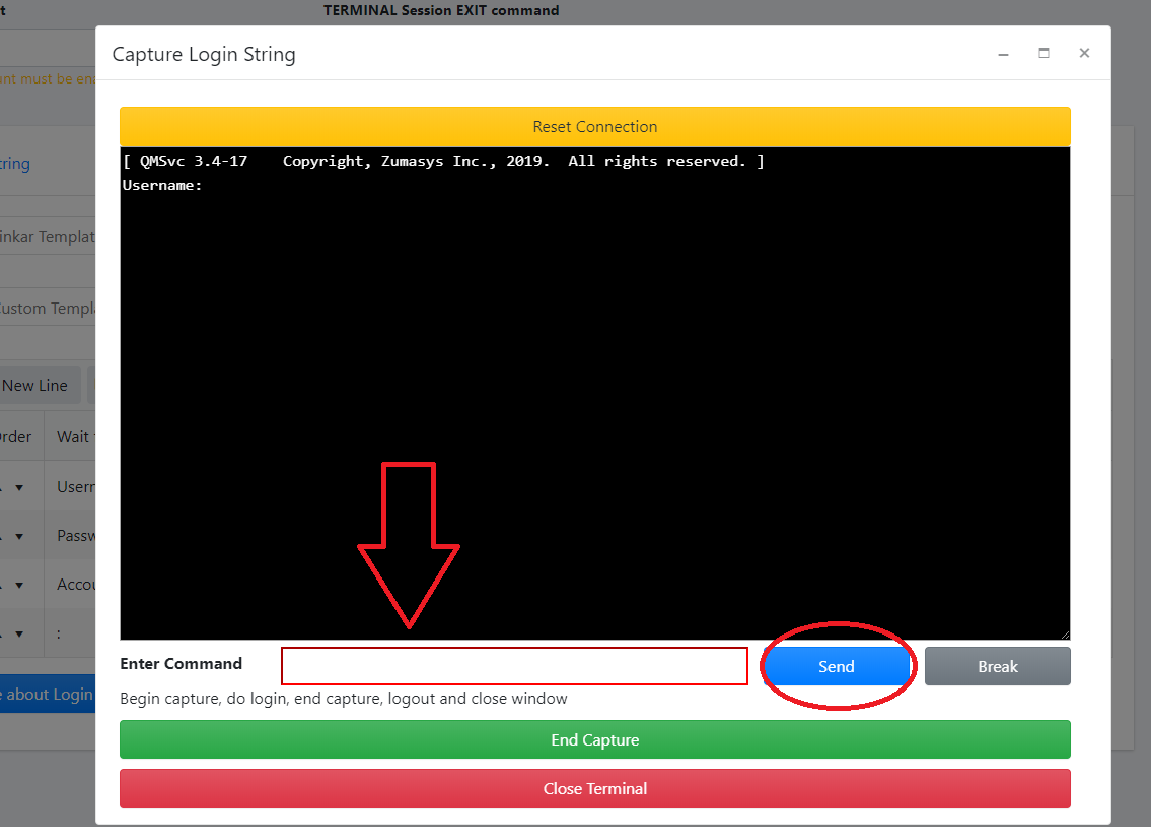
Linkar MANAGER also includes a wizard to capture a live connection, step by step.
On clicking on the Capture Login String button, Linkar MANAGER will attempt to establish a Telnet or SSH connection with your database. Enter text into the red text box, then press the Enter key or click the Send button.
If there is no initial response from the server, try Enter/Send with no command text. If that results in a prompt this means the very first row in the Login String should have an empty "Wait for the Text" value, an empty Send Text value, and a check for Add CR.
If there is still no response from the server, verify the host name/IP defined in the Profile for the database. See Network Issues and Permissions for possible issues related to firewalls and TCP ports.
If there is a prompt from the database, in this case "Username:", type the desired credentials in the red box, follow with Enter/Send. Note that the intent is not just to login but to login as the user which will be used to process transactions.
Repeat this process until you reach TCL in the data account defined for the current EntryPoint.
Press the green End Capture button. The steps captured for this connection will display in the table.
It should not be necessary to execute the quit or exit command. Click the red Close Terminal button to close the session. This executes the Terminal Session Exit command. If this does not properly terminate the session, consider replacing that command, or check system settings to ensure a broken connection properly disconnects all login sessions.
Review the strings for accuracy. Try the Test Login String Connection button. Repeat as required. Save the Login String as a new Custom Template.
Once the connection with the Test Login String Connection button is verified, press the END button to finish the configuration.
•Modifying the grid:
Fields in the grid (cells) are displayed as labels, not as text boxes. The fields do not look like they can be edited but they can - just click on a cell.
Modified cells have a marker in the top-left corner.
At this time there is no Un-Do feature.
• + Add new line:
With this button, add new lines to the end of the grid.
•Trash/Rubbish icon:
With this button, delete individual lines.
•Column Nº:
In this display-only column, the order of execution of each grid line is presented. This is provided simply to help with discussions about specific steps.
•Order column:
In this column, there are two icons, up arrow and down arrow. Use these to modify the order of execution of any line.
•Wait for Text column:
In this column, indicate the text that is expected to be received from the database at each step. This does not need to be a complete word or phrase. It just needs to be text that is unique enough to verify that the next step has been reached. An empty field means "wait for nothing", perhaps simply to wait for a short timeout period.
•In Any Place column:
If checked, the connection processor will wait for the time defined in the Waiting time in seconds column. Once that time period has elapsed, it will verify that the text of the Wait for Text column has been received somewhere within the entire received string, and will then send the Send Text value.
If not checked, the Send Text value is sent immediately upon detecting the Wait for Text in the output stream anytime within the Waiting time in seconds timeout period. The connection will be much faster with this method, but caution is advised: If the Wait for Text is not unique, the Send Text value might be sent earlier than desired. The server Type-ahead buffers and other details determine how this can affect the login process.
•Send Text column:
In this column, enter text that will be sent to the command-line in response to the Wait for Text.
Special placeholders can be used:
•%username% will use the value of the 'Username' box. •%password% will use the value of the 'Password' box. •%account% will use the value of the 'MV Account' box. •%password2% will use the value of the 'Password 2' box. •%password3% will use the value of the 'Password 3' box. • D3-only : %forced3port% will use the value of the 'Range D3 ports to Force' box.
•ADD CR Carriage Return column:
Add a CR character (ASCII 13 x0D) to the Send Text.
•ADD LF End of line column:
Add a LF character (ASCII 10 x0A) to the Send Text. As expected, if both CR and LF are present, the sequence is CRLF. This is a convenience for environments where the End-Of-Line (EOL) is not consistent. •Waiting time in seconds next step column:
This is the time in seconds that the scripting process will wait for the Wait for Text.
When In Any Place is not checked, this is a timeout. After the number of seconds specified the process will continue to the next line to wait for the next Wait for Text. If this happens it is reasonably certain that the login has failed.
When In Any Place is checked, this is not a timeout. The process will wait for the entire Waiting time period even if the expected text has already been received.
Once a Login String is defined, press the Test Login String Connection button to verify that the connection progresses as expected. Click Save As Custom Template to re-use the Login String later.
If required, continue with configuration of a Socket connection.
When using the New EntryPoint Wizard with this screen, on clicking End an option will be presented to enable the account for use with Linkar. |
Depending on the Telnet / SSH server, it may be necessary to define site-specific character conversions which will occur in all transactions with the current EntryPoint.
Defaults are pre-set for each OS/DBMS configuration.
•Maximum Telnet Data Packet Size:
Size of each Telnet package sent or received.
•Telnet Communication Timeout:
If the time elapsed between sending or receiving 2 packets exceeds this value in seconds, a transaction error is generated. This rare condition is always due to Telnet communication failure.
•To/From Database:
•Replace MV marks: Replaces DBMS delimiters, 251 to 254 in packet exchanges. You will need to mark these if your Linkar Server is running on Linux or MacOS.
•Replace Control Characters: Replaces the control characters, char (0) to char (31) in packet exchanges.
•Replace Extended Characters: Replaces the extended characters, char (128) to char (255) in packet exchanges. Includes MV marks.
The configuration of these parameters affects communication speed. We do not recommend changing these values unless it is necessary for the proper functioning of the communication system. |
If required, continue with configuration of a Socket connection.
When using the New EntryPoint Wizard with this screen, on clicking End an option will be presented to enable the account for use with Linkar.


